Manage Employees - Tax / Compensation Tab
This tab allows users to enter the information required before a check can be processed for this employee.

Federal Tax Info
In August 2019, the IRS released the new Federal W-4 for 2020. With the new form, employees will provide withholding amounts instead of the number of exemptions. Withholding amount fields have been added to this section in order for withholding amounts to be entered. Current information populated in this section will become read-only on January 1st, 2020. To make a change, click the  link, which will change the fields to the new 2020 fields.
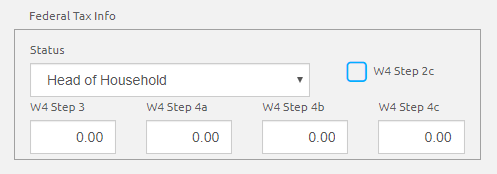
- Select the status from the Status drop-down list.
- Check the W4 Step 2c box, if applicable.
- Enter the Claim Dependents amount in the W4 Step 3 field, if applicable. This is an annual amount.
- Enter the Other Income amount in the W4 Step 4a field, if applicable. This is an annual amount.
- Enter the Deductions amount in the W4 Step 4b field, if applicable. This is an annual amount.
- Enter the Extra Withholding amount in the W4 Step 4c field, if applicable. This is a per pay period amount.
TIP: Hover over the withholdings fields to view helpful popups.
State Tax Info
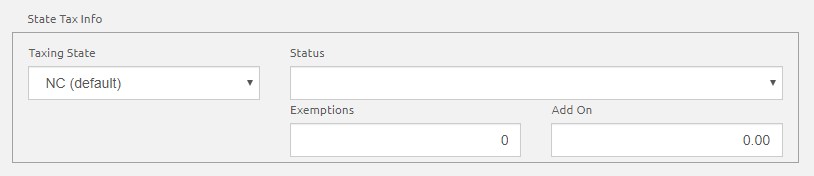
- Select the state from the Taxing State drop-down list.
- Select the status from the Status drop-down list.
- Enter the number of exemptions in the Exemptions drop-down list.
- Enter an Add On amount, if applicable, based on the employee's state tax withholding form. Add Ons are considered a voluntary deduction and will only be taken if the job is set to allow deductions.
Compensation
Direct Deposit
Only fill out this section if the employee has a direct deposit.

-
Click the
.png) link to add a new bank. A new row is added.
link to add a new bank. A new row is added. - If there is more than one bank, set the priority by entering the order in the Priority field.
- Select a bank for direct deposit from the Bank Name list. Bank Names and Routing Numbers are set up under Direct Deposit Banks.
- Enter the employee’s bank account number in the Account Number field.
- Select Checking or Savings from the Account Type drop-down list.
- The Validated column is checked by default. Uncheck if this employee needs to be pre-noted for the ACH file. Prenoting is recommended for the first direct deposit check the employee receives, or if the employee changes their direct deposit information. If pre-noted, the employee will receive a physical check, and the bank will receive the ACH information in a preliminary format.
- Select Percent or Amount from the Type drop-down list.
- Enter the percentage or amount for this bank account in the %/$ of Amt Remaining field.
- Direct deposits can be split among multiple banks:
- Deposits are made based on the order the banks are listed on the screen.
- It starts from the bottom of the list, and the goes to the top. The order of the banks can be changed with the up and down arrows.
- If the amount being paid does not match the allocations, it adjusts the amount for the first bank listed. In the example shown above, it will deposit 25% to the second bank listed, and the rest would go to the first bank listed.
- Direct deposits can be split among multiple banks:
- Click the
 icon to delete the Direct Deposit Bank.
 - Click the
 button.
Checks Issued
Checks Issued displays the employee’s Calendar Year-To-Date totals and check details.
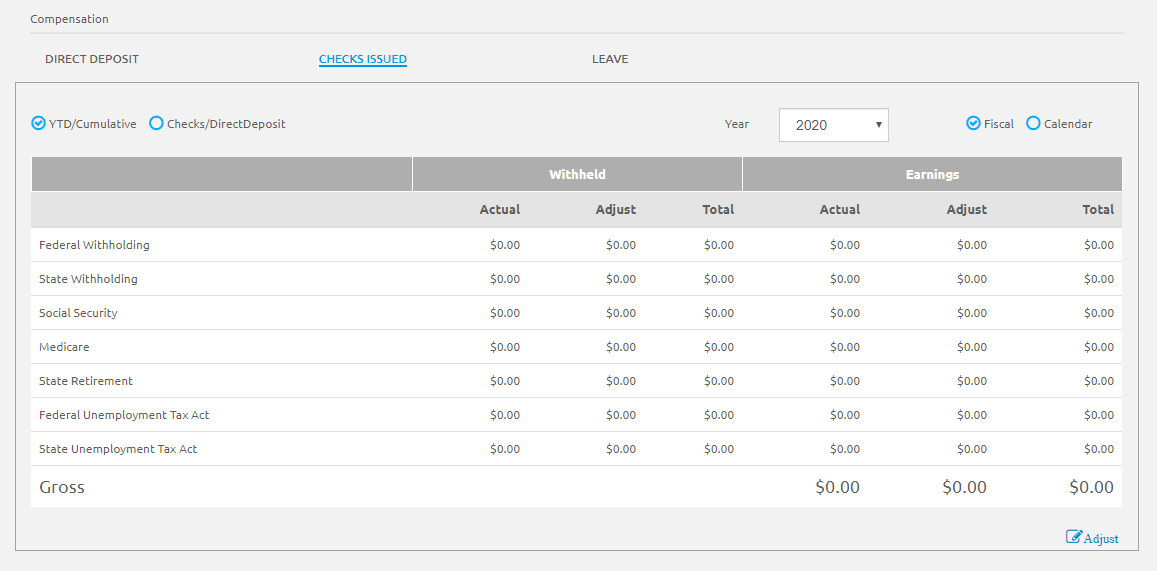
- Select YTD/Cumulative or Checks/Direct Deposit to change the results in the grid.
YTD/Cumulative displays the Calendar Year-To-Date earnings and taxes.
- Checks/Direct Deposit displays the checks this employee has received, including the Check Number, Type, Check Date, Gross (Pay), Net Pay, Void Date (if applicable) and a way to Print a pay stub.
- Select a year from the Year drop-down list to display results for that year.
- Select whether that year selection reflects a Fiscal year or Calendar year.
Add Adjustment
IMPORTANT! Please do this with extreme caution. They are unedited adjustments that affect the employee’s history and your reports, including Payroll Trial Balance, 941, SUTA, ORBIT (if applicable), and W2s.
- Click the
 link to make unedited changes to the employee’s earnings, withholdings and employer matching associated with the earnings, unedited changes to the employee’s deductions.
 Adjustments do NOT interface with Fund Management.
Please contact LINQ Support before proceeding if you are not familiar with this option.
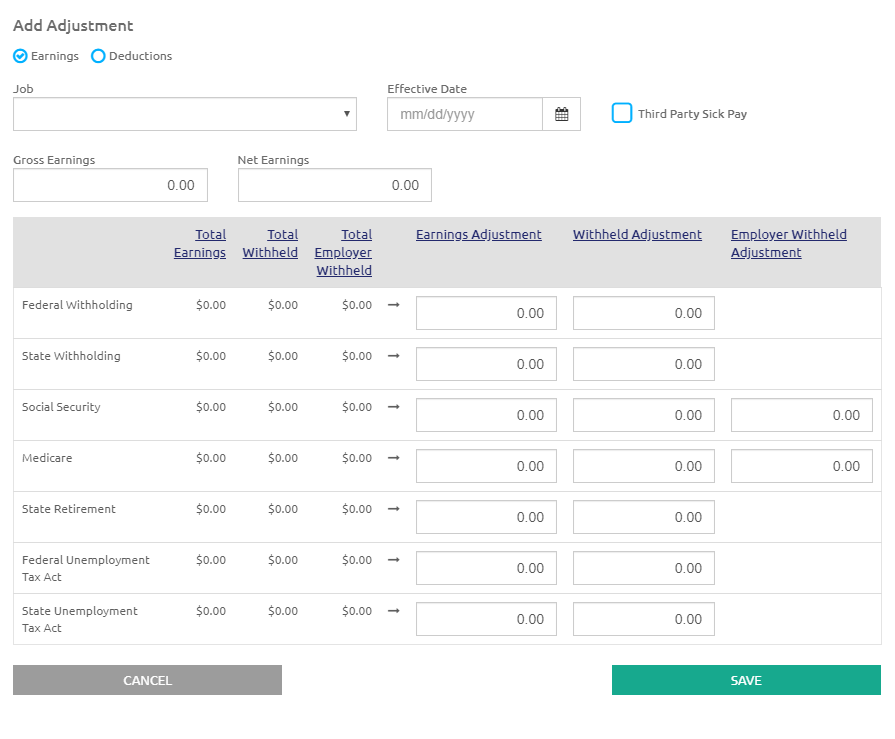
NOTE: Users are now able to adjust Federal Unemployment Tax Act (FUTA) and State Unemployment Tax Act (SUTA) earnings when adding adjustments.
- Select Earnings or Deductions to make the appropriate adjustments.
- Earnings:
- Select the employee job to be adjusted from the Job drop-down list.
- Enter or select the Effective Date for this adjustment. Effective date defaults to today’s date but can be changed as needed.
Check the Third Party Sick Pay check box if it applies to this adjustment.
- Enter an amount in the Gross or Net Earnings fields, if necessary.
- Enter the amount of adjustment next to the earnings being adjusted. If the withholding or employer matching amount associated with the earnings needs to be adjusted, enter that amount in the Withheld and Employer fields.
- Only enter amounts in the fields you need to adjust. You may adjust earnings without adjusting withholdings and vice versa.
- Adjustment amounts may be positive (to increase earnings or withholdings) or negative (to reduce earnings or withholdings).
- Click the button.
OR
- Deductions:
Select the employee job to be adjusted from the Job drop-down list.
Enter or select the Effective Date for this adjustment using the Calendar feature.
Select the Deduction to be adjusted.
If you are adjusting the amount withheld for the employee’s portion, enter the adjustment next to Employee.
If you are adjusting the employer’s matching amount, enter the adjustment amount next to Employer.
These amounts may be positive (to increase the deduction) or negative (to reduce the deduction).
You may adjust one without adjusting the other.
- Click the button.
- Earnings:
Leave
Leave displays the employee’s leave records.
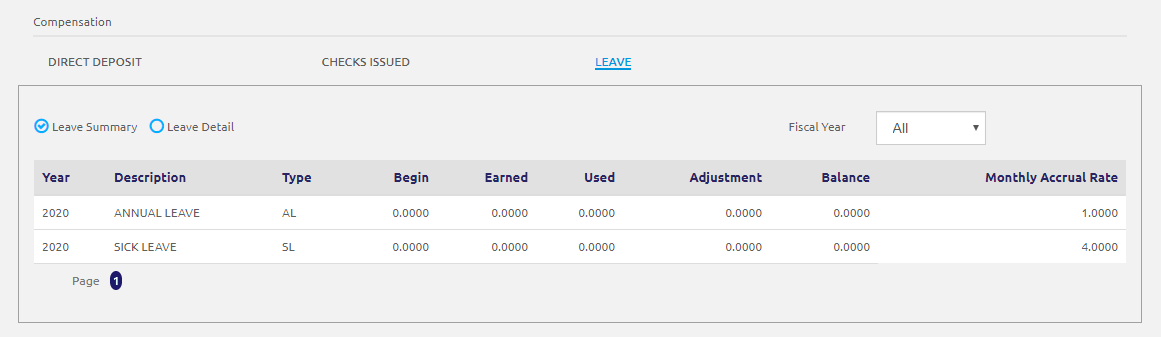
- Select Leave Summary or Leave Detail.
- Leave Summary displays a summary, by fiscal year, with the beginning balance, leave earned, leave used, adjustments, ending balance, and monthly accrual rate for each leave type.
- Leave Details displays details on leave type.
Leave Accruals from payroll are shown with record type Accrual.
Absences from payroll entries are shown with the selected Record Type and the Absence Code (Short Description) that was used.
- Click the link to add a leave adjustment.
- Select the description from the Description drop-down list.
Enter or select the Date using the Calendar feature.
- Notes are recommended but not required.
- Enter the number of Hours (positive or negative) to be adjusted. NOTE: Leave adjustments can be deleted but Accruals and Absences cannot be deleted from this screen.
- Click the button next to an adjustment to delete it.
- Click the button.
- Click the
- Click the button.


©2021 | EMS LINQ, Inc.
School LINQ Help, updated 01/2021